When arrived in Malmö city, we were welcomed with an exploration tour of the third biggest city in Sweden. The next day Øredev 2016 officially started! It was noticeable that there was a healthy combination for everyone: Microservices, Docker, UX, Management, etc… All these buzzwords were applied in various talks. This blog post will be about the talks I favoured and the extra knowledge I gained which I now get to apply in my nowadays projects.

The Overview Wizard
- Dockerizing Microservices
- Secure your Docker
- Kubernetes
- Best Practices & Traps to avoid in UX
- Linked data API: The future of HTTP API’s?
Dockerizing Microservices
The Slideless Microservices session - Adam Bien

Adam Bien is an Expert Group member for the Java EE 6 and 7, EJB 3.X, JAX-RS, and JPA 2.X JSRs. He has worked with Java technology since JDK 1.0 and with Servlets/EJB 1.0 and is now an architect and developer for Java SE and Java EE projects. He has authored several books about JavaFX, J2EE, and Java EE, and he is the author of Real World Java EE Patterns—Rethinking Best Practices and Real World Java EE Night Hacks—Dissecting the Business Tier. Adam is also a Java Champion, Top Java Ambassador 2012, and JavaOne 2009, 2011, 2012, 2013 and 2014 Rock Star.
In this session Adam guided us in how to dockerize and communicate between microservices. He says that involving the container technology to the microservices ecosystem is considered the future and inevitable. When looking into the communication between dockerized microservices, there are several ways in doing so. Before communicating, we first make the service dockerized with the help of a Dockerfile.
The Dockerfile will be the configuration for your image:
FROM openjdk:8-jre                     // Which base image am I using?
VOLUME /tmp                            // Is where you will send data to
ADD service.jar app.jar                // Copies the existing jar in to the image
RUN sh -c 'touch /app.jar'             // This will execute any commands in a new layer on top of the current image
EXPOSE 42001                           // Which ports should I open at runtime?
ENTRYPOINT ["java","-jar", "/app.jar"] // This will allow you to configure a container that will run as an executable
After we created the Dockerfile we will have to setup a Docker network for connecting these containers. Since Adam is doing this manually, I will explain you how to do it easier with Docker Compose.
Docker Compose will run all the containers you setup in the configuration. Since we work with the microservices ecosystem, we will need a lot of containers.
To build our image using the Dockerfile, we will add a Docker dependency in our pom.xml.
First add a property for naming your repository:
<docker.image.prefix>testApp</docker.image.prefix>And add support for docker:
<plugin>
  <groupId>com.spotify</groupId>
  <artifactId>docker-maven-plugin</artifactId>
  <version>0.4.13</version>
  <executions>
    <execution>
      <phase>package</phase>
        <goals>
          <goal>build</goal>
        </goals>
    </execution>
  </executions>
  <configuration>
    <imageName>${docker.image.prefix}/${project.artifactId}</imageName>
    <dockerDirectory>${project.basedir}/src/main/docker</dockerDirectory>
    <resources>
      <resource>
        <targetPath>/</targetPath>
        <directory>${project.build.directory}</directory>
        <include>${project.build.finalName}.jar</include>
      </resource>
    </resources>
  </configuration>
</plugin>
First we make images of our services using the Maven Docker plugin from Spotify. Every time Mavens builds the project, a Docker image is generated.
Docker Compose
To tell the containers that they have to be under the same network, we will use Docker Compose.
First we make a docker-compose.yml file and configure our microservices:
version: '2'
services:

  cars:
    image: testApp/cars-service
    ports:
      - "8081"
    networks:
      - backend

  gateway:
      image: testApp/zuul-service
      ports:
        - "9900:9900"
      networks:
        - backend

networks:
  backend:
Variables explanation:
image- The image you will be using to create the container, we will be using our microservice image
ports- The port the service will listen to. When you want to expose your port use: “5432:5432”.
build- This will build the Dockerfile inside the same directory
networks as property- This be the network to which you want to be assigned to
networks- This will create one or multiple networks
When you want to add an Eureka service, follow the above steps and configure it inside the docker-compose.yml file.
It is important that every container, you want to communicate with, resides under the same network.
Secure systems with Docker - Emil Kvarnhammer

Emil Kvarnhammer is a Security Software Engineer at TrueSec, a leading edge company in IT security and development. He’s been involved in several security-critical projects, developing applications and components that are used by millions of users on a regular basis. Emil has found severe security vulnerabilities in Apple OS X. His recent focus has been securing systems using Docker and Amazon EC2.
When entering the world of cloud and distributed systems, security can be challenging for developers and DevOps. Docker is a part of this world and Emil talks about Docker from a security perspective.
When looking at it in a secure way, what are the input sources? Where does the base image come from? If we look closer we can see that it retrieves its images from Docker Hub. In addition to that, more complexity comes in when we add new packages on top of the base image that will be retrieved from the package manager server. Finally we have the application package that can come from a CI server and, if it is a fat jar, it can consist of different dependencies through Maven or some kind.
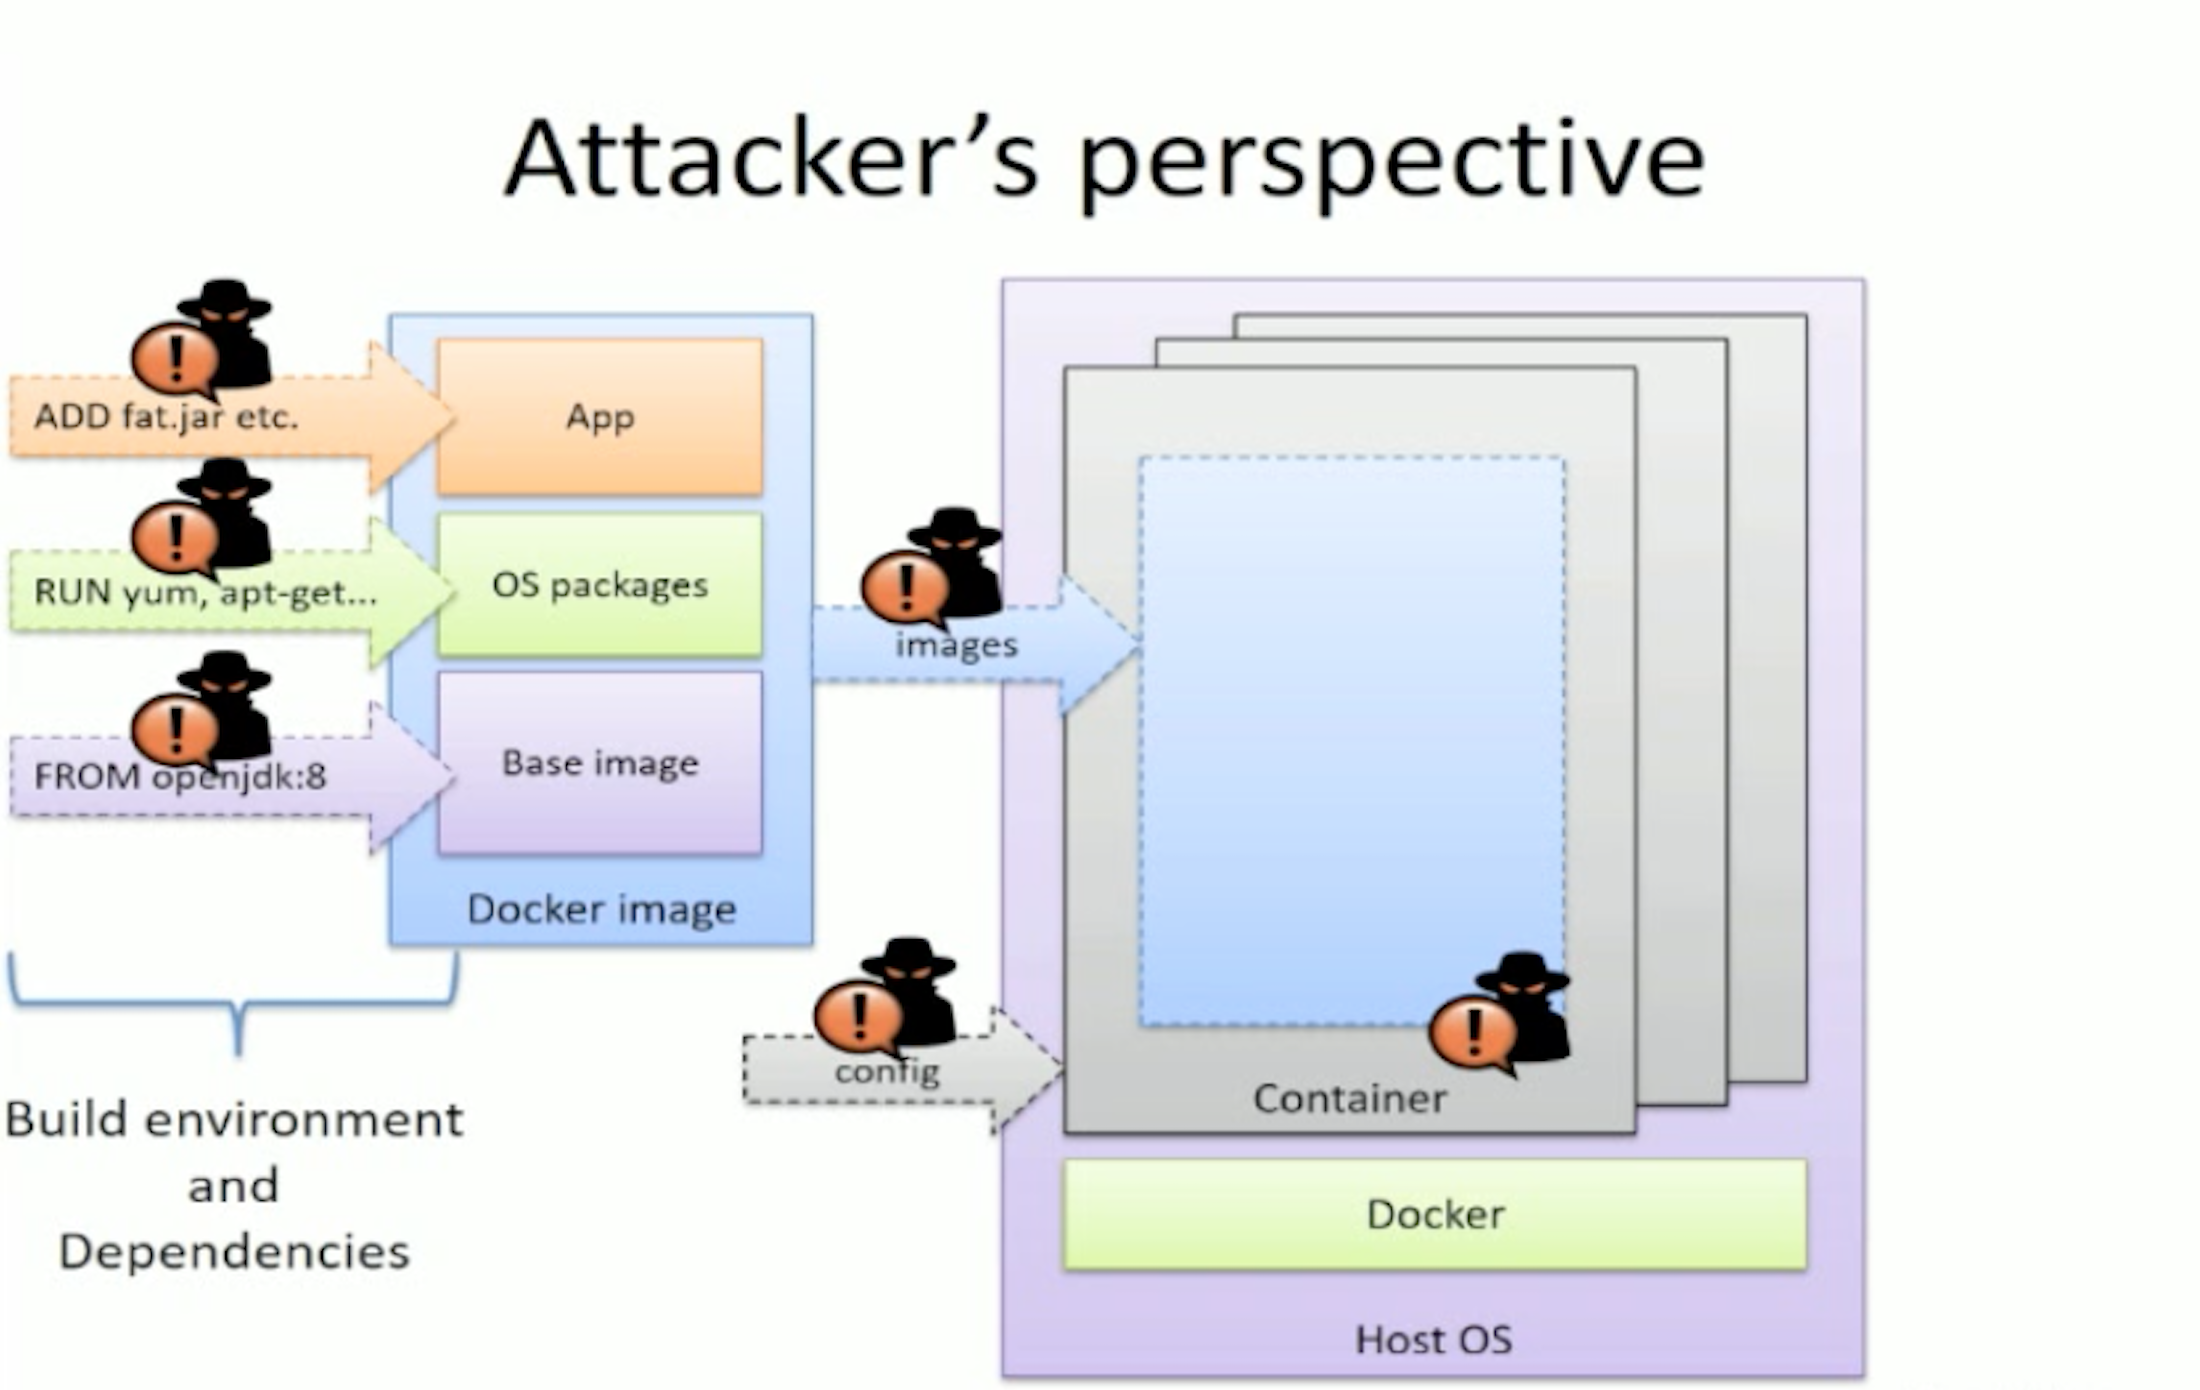
The base image is retrieved from Docker Hub every time a Docker image is being updated. A hacker could hijack the image and squeeze in malicious software without anyone noticing. Same goes for the package manager server.
What could an attacker do if he gets control of the channel between the Docker image and the host operating system? The place where the image gets instantiated or the configuration related to the instantiated image. An attacker could infect the image with his own configuration or modify the orchestration tool.
The most important issue is when the attacker gets control of code execution within our application. Emil says that it happens quite often and if it isn’t in your code, it is in the third party libraries or the package manager server you’re using.
Now you might think that, seeing as the attacker is in a docker container, that he is unable to break out. Think again, he can break out and gain control of the whole operating system.
Building secure images
- Choose base image carefully
- Strategy for security patches - Regularly update your Docker container so it gets the necessary updates
- Continuously rebuild and test - Security patches in your build environment
- In a secure build environment
- Digitally sign Docker images -
# docker build -t test --disabled-content-trust=false
Internal private registry - Push and pull the containers internally
This private registry is insecure by design. If an attacker gains control of the network where the registry is located, he can easily read and modify each image. An attacker pushes a modified image and the orchestration will pull this in.
If the attacker gains control of your CI/CD server he can again push modified images to the registry. To avoid this attack, be sure to have these activated inside your registry.
- Secure transfer using TLS
- User authentication
- Limited access rights
- Docker Content Trust which will digitally sign your images
- Secured development environment
How does the attacker inject code?
You use whatever Docker image available in the registry and add your backdoor binary in a Dockerfile, then you build the image and point it to the very same image in the registry.
Security measurements inside the container
- User namespaces
- An extra security measure are user namespaces, this will make the root in the container differentiate from the root in the host.
- Remote API
- If you have no good reason for using the remote API then you should disable this option.
- If you have to use it, be sure to use secure transport over TLS and that you have client authentication so you don’t let the world in.
- Try to enable SELinux (enforcing) on the host
- Drop unused capabilities that are installed by default and install the capabilities that you actually need.
--cap-drop=ALL--cap-add=needed_cap
- Only pull from private registries
Things you should avoid in Docker
--privileged: breakout is trivial and will give you access to different machines- Be sure to check that Kubernetes is not doing this
--insecure-registry: disable TLS requirement--net=host: use host network stack
Kubernetes automation in production - Paul Bakker

Paul Bakker is working as a software architect for Luminis Technologies, where he’s currently leading the team that develops the CloudRTI, a Kubernetes/Docker based service that takes care of DevOps tasks like blue/green deployment, failover, centralised logging and monitoring. He is the author of “Building Modular Cloud Apps With OSGi” published by O’Reilly and an advocate for modularity in software. He is currently writing his second book for O’Reilly “Java 9 Modularity” which is expected early 2017. He’s a regular speaker at conferences speaking both about modularity/OSGi related topics, and topics related to Kubernetes and cloud architecture in general.
Kubernetes is momentarily the best tool to use for orchestrating containers in a clustered production environment. In this technical deep dive you will learn the architecture and production deployment of Kubernetes.
Why Kubernetes?
- Run Docker in clusters
- Scheduling containers on machines - Load balance and failover containers
- Networking - How to communicate between containers
- Storage - Use a network attached database
- Automation - A commit will result in a new deployment
The Architecture
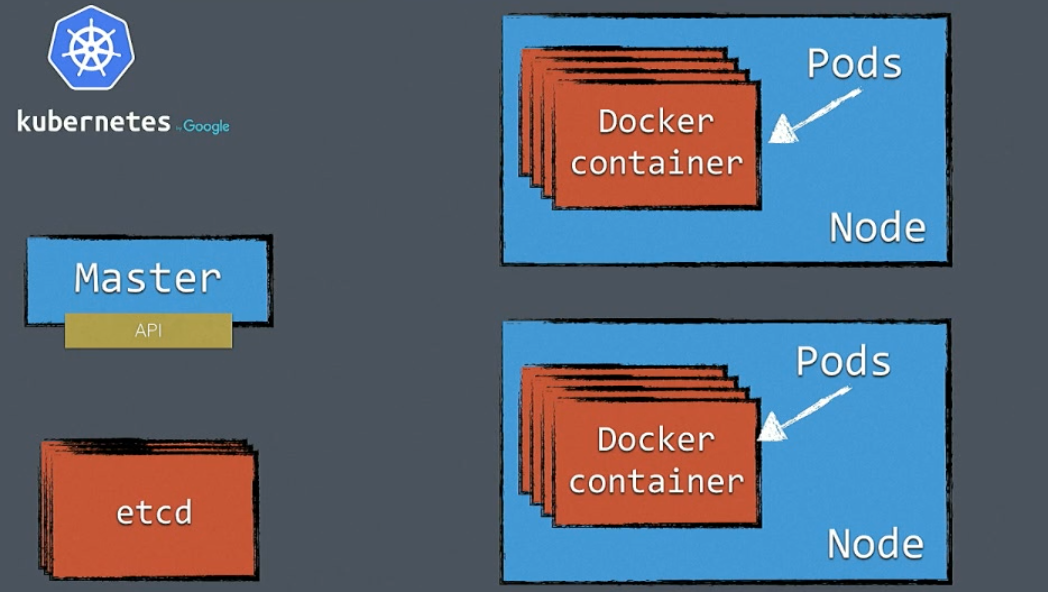
Master
The master component is the most important component of Kubernetes, everything that happens in the cluster is handled by the master. Generally there is one master but you can have a failover setup and work with multiple masters. For now we simply see this as a single component with an API. When a master goes down, the rest keeps running, but during that moment you won’t get any scheduling or things like that.
Replication Controller
The controller is there to configure where and how many nodes the container has to run in. It will manage scheduling and monitoring inside the cluster, so if one container crashes for some reason, the replication controller will look at how many replicas you configured and if one is down, it will schedule a new instance into the cluster. It is important that we don’t start our containers ourselves but configure the amount of replicas that are necessary. After our containers are set up, the cluster will take care of it and monitor it.
Worker nodes
This is where your docker containers will run in.
Pods
An abstraction on top of containers inside the worker node:
- May contain multiple containers
- Lifecycle of these containers bound together
- Don’t place microservices into the same pod
- Containers in a pod see each other on localhost
- Env vars for services
Etcd
Is a key-value store and contains the configuration of the cluster. You don’t want to lose your etcd otherwise your cluster will go down. If you want fault tolerance, you will need quite a lot of machines. At least one master and three worker nodes to meet the requirements.
Network
These pods will have to talk to each other so you will have to open ports.
- We run many pods on a single machine
- Pods may expose the same ports
How to avoid conflicts?
- Each pod gets a virtual IP
- Ports are not shared with other pods
This can cause some troubles when your process crashes and obtains a new IP address. So how do they keep communicating? Are they tracking each other? Do we have to use something like a service discovery? It would be complex if you want to go there and at the end, you don’t want to depend on those virtual IP addresses. If you want the pods to communicate, we will be using services as a proxy on top of them.
Services
Service are basically a proxy on top of the pod and if you look from a technical perspective, we see configured IP tables. When we create a service, it gets a fixed IP address and a DNS name so we can communicate through our services. Finally it will round-robin traffic to the destined paths and keep track of which paths are running.
Multi component deployments (microservices):
- Each component deployed as a pod
- Individually update and scale pods
- Use services for component communication
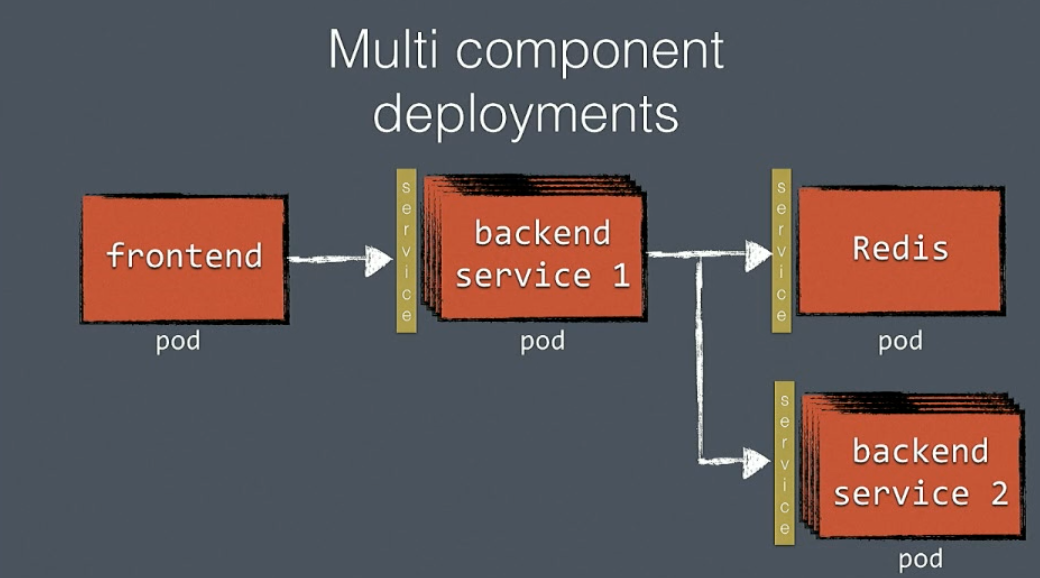
The Frontend talks to the service of the backend pod and this will round robin the call to the right instances.
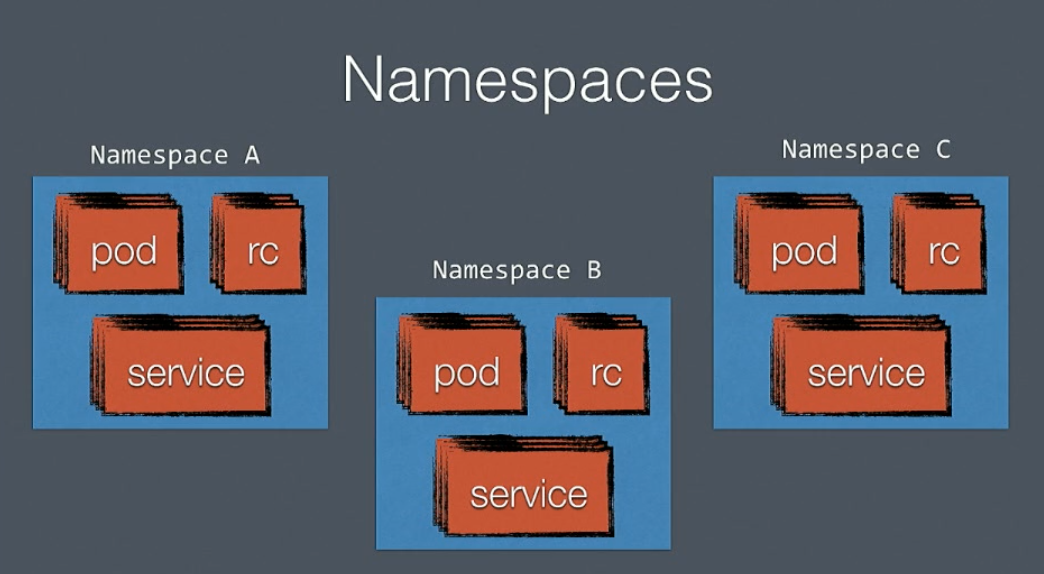
Namespaces
Isolated world in Kubernetes where you can have different environments inside the same cluster. If you want to run a TEST, DEV and PRD environment it’s possible with Kubernetes to keep them isolated from each other.
Kubernetes in Production
HTTP load balancing
Kubernetes does not have support for the following points in production so be sure to have a look at the following points when deploying to PRD.
- Expose Kubernetes services to the outside world
- SSL offloading
- Gzip
- Redirects - redirect every HTTP call to HTTPS
NodePort
- Exposing service ports as ports on physical nodes
- Beware of port conflicts!
kubectl expose deployment my-nginx --type=NodePort
Kubernetes Ingress
- Level 7 load balancer configuration
- SSL offloading
- Support for GCE load balancers
- Future support for extensions (not quite there yet)
- At the moment useful on Google Cloud Engine
Using a custom load balancer
- Use HAProxy in front of Kubernetes
- Configure HAProxy dynamically
- The same works for NGINX and Apache
- HAProxy does SSL offloading
How does ha-proxy know about our services?
- HAProxy uses a static config file
- Auto-generate it based on data in etcd
- Confd
Blue-green deployment
- Deployment without downtime
- Only one version is active at a time
- Rolls back on failed deployment
When updating our cluster we have two options: We want to update our cluster with a rolling update, which updates one pod at a time, rather than taking down the entire service at the same time or you can do a blue-green deployment where you make an entirely new cluster of instances and let the load balancer go from blue to green.
A developer’s guide to the UX galaxy - Tess Ferrandez

Tess Ferrandez is a full stack developer on the Microsoft Platform. She is equally happy debugging nasty backend issues as she is developing apps or working on UI/UX design. She has been blogging at her blogsite for the better part of her career, and has spoken at lots and lots of conferences around the world.
Software is built into two parts, it is what we see and how we do it. In this session Tess talks about what these features should look like. If you design ‘an order’ incorrectly and the user can’t figure out to place that order, you have a bad UX design and it could cost your company a lot of money. Now, two UX researches at Microsoft deep dived into hundred years of research of signs and symbols and listened to what people define as a good interface. Finally they categorized every piece into ‘Tenets’ (attributes of good user interfaces) and ‘Traps’ (bloopers and things to avoid).
Tenets: attributes of good use
We will be using a scanner as example that you use in the supermarket.
Understandable
Ask yourself, what can I do? Is it understandable? If you look at the scanner in a supermarket, do you know which button you have to press to register a product? It is important to let your users understand what they are interacting with because if they have to read the manual first or ask someone for help, you’re doing something wrong.
Physically effortless
Is what I’m holding quick and comfortable to use? When scanning a product you want your users to feel that they can scan the product easily and without difficulty.
Responsive
You get immediate feedback, when scanning a product you get an immediate response (ex: Hey! you scanned something) If you don’t get an immediate response, the user will keep trying to scan the product and at the end he will have ten milk boxes.
Efficient
What is the most efficient way in a process? The best way to buy ten milk boxes is to scan the milk ten times than to write it down ten times with your other hand.
Forgiving
I can undo my actions. If I scan too many items, I have a minus button to unregister the last item. It’s a bad practice if there is no button and you have to ask an employee to help you.
Discrete
Don’t over share, don’t overreact. Having a siren on the scanner to point out that you did something wrong is too much.
Protective
Always deliver a qualified product with no failure or data loss. A bad practice for example is that after you just filled in a form, clicked through to the next page and tried to go back to the form to add some missing information only to find out that your form has been completely reset.
Habituating
Muscle memory, make it a habit to use. When users go to your website and know where to go to buy a specific product automatically after visiting it a couple of times. Try to avoid changing your structure over and over and if you do so, make sure that you remind your users of the change in advance.
Beautiful
I find it attractive compelling. Make the user think that you put a lot of effort in it. Use the same buttons, nicely aligned and use the same colors.
Traps: attributes to avoid
Every ‘Tenet’ has its own set of traps, each trap is there to teach us to avoid it as much as possible.
Understandable Traps
Perceptible
Invisible Element
The user has learned about a critical hidden capability but cannot see it.

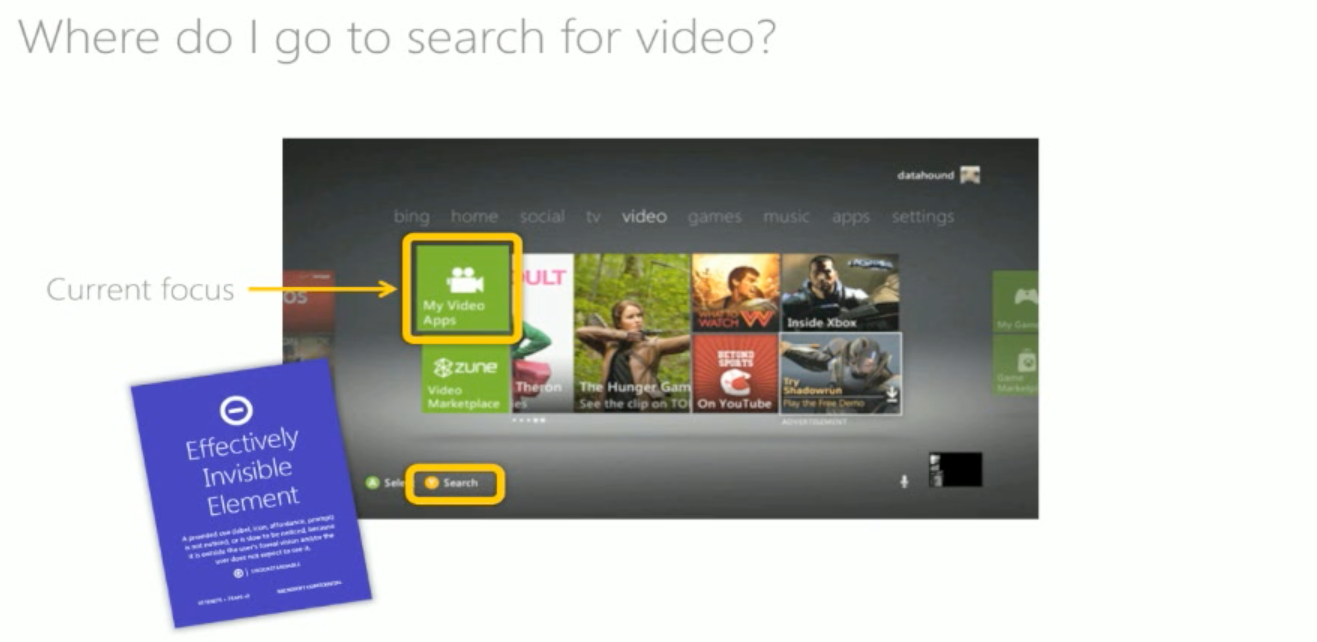
Noticeable
Effectively Invisible Element
A critical cue goes unseen because it is outside of the user’s vision or unexpected.
Distraction
Something is drawing the user’s attention from what they need to see.

Comprehensible Traps
Uncomprehended Element
It looks wrong but it is right (ex. If they have to put a sticker on it, you are doing something wrong)
Inviting Dead End
It looks right but it is wrong (ex. Having a music icon on your IPhone and you expect iTunes, but it is not iTunes)

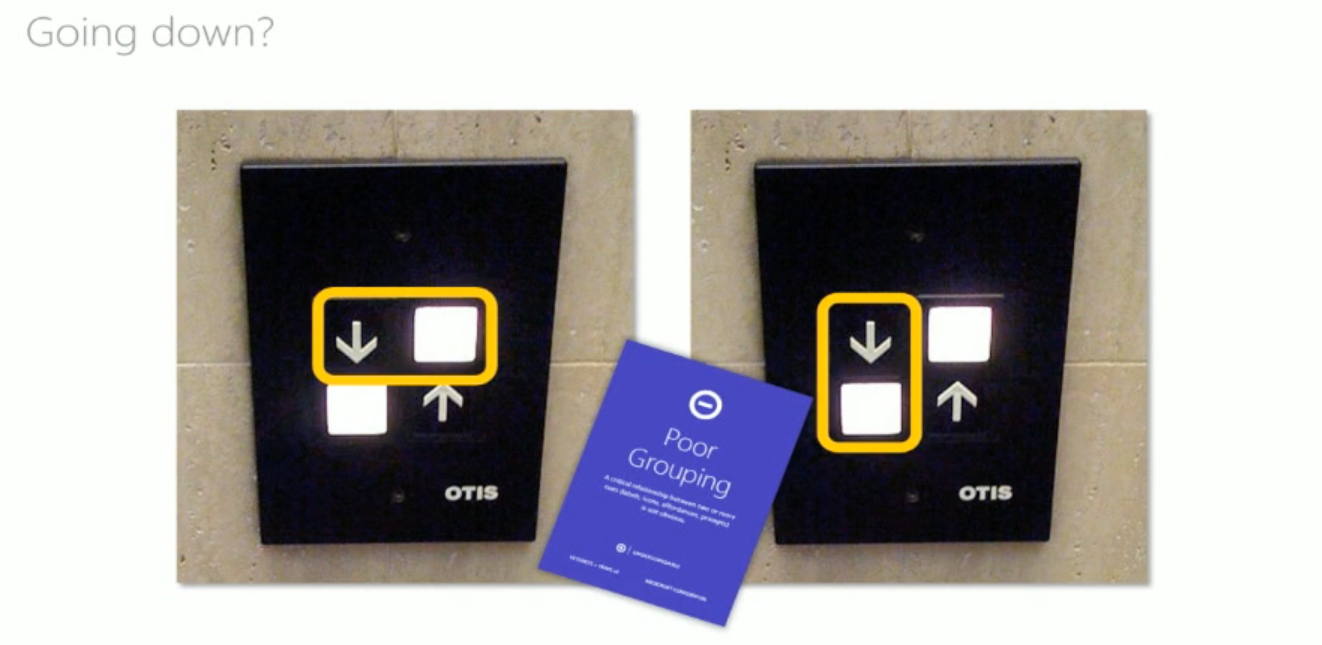
Poor Grouping
A link between two or more elements is not recognized (ex. Right icon with the wrong button)
Memory Challenge
An unreasonable demand is made on the user’s memory.
Confirmatory Traps
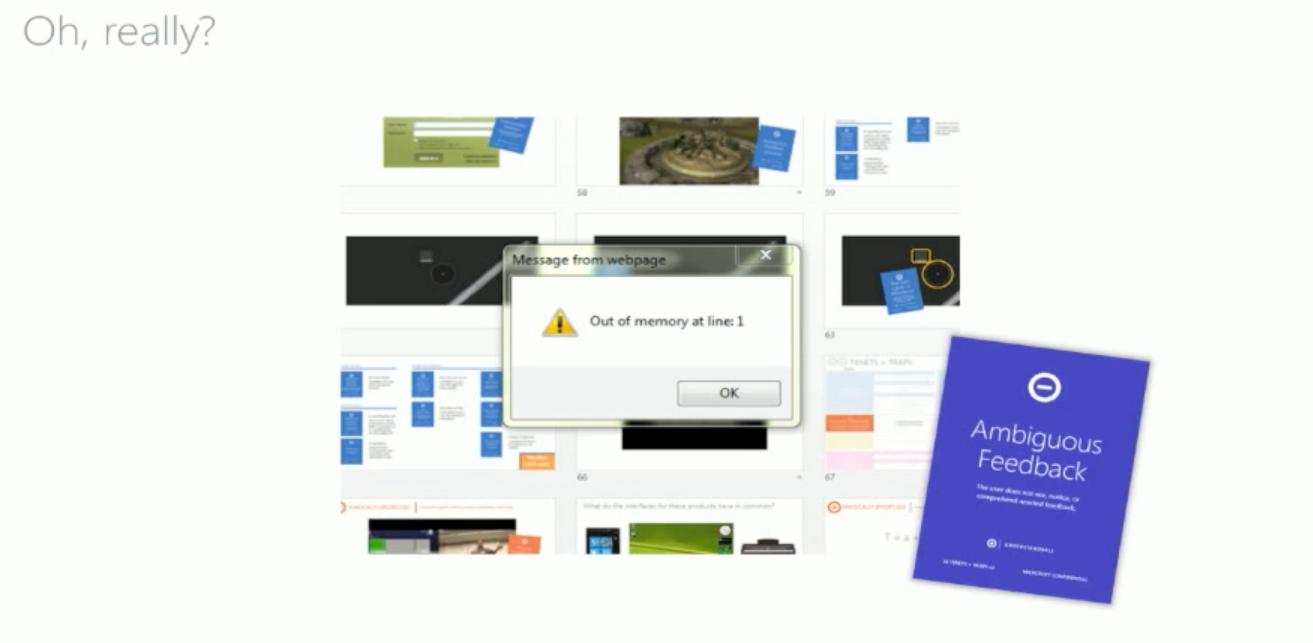
Ambiguous Feedback
The feedback or response to a user action is unclear or absent
Physically effortless Traps - Targeting and readability
- Buttons should be big enough to press
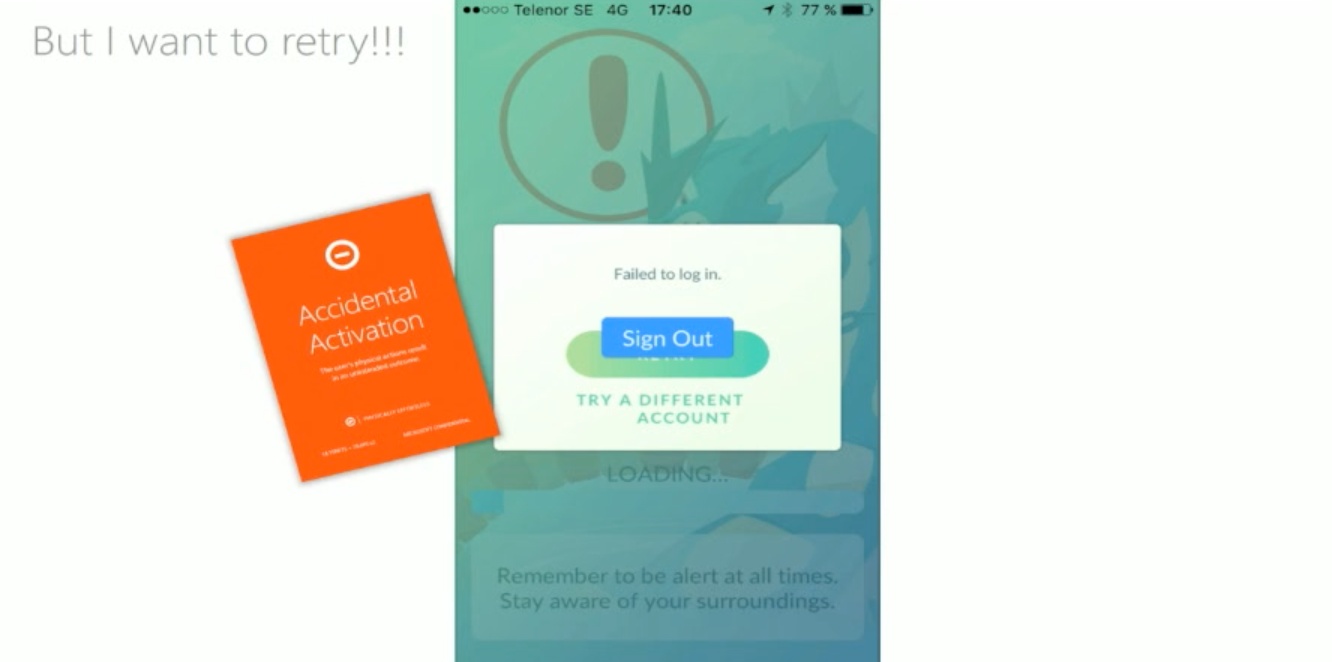
Accidental activation
Trying to click one button but clicking another.
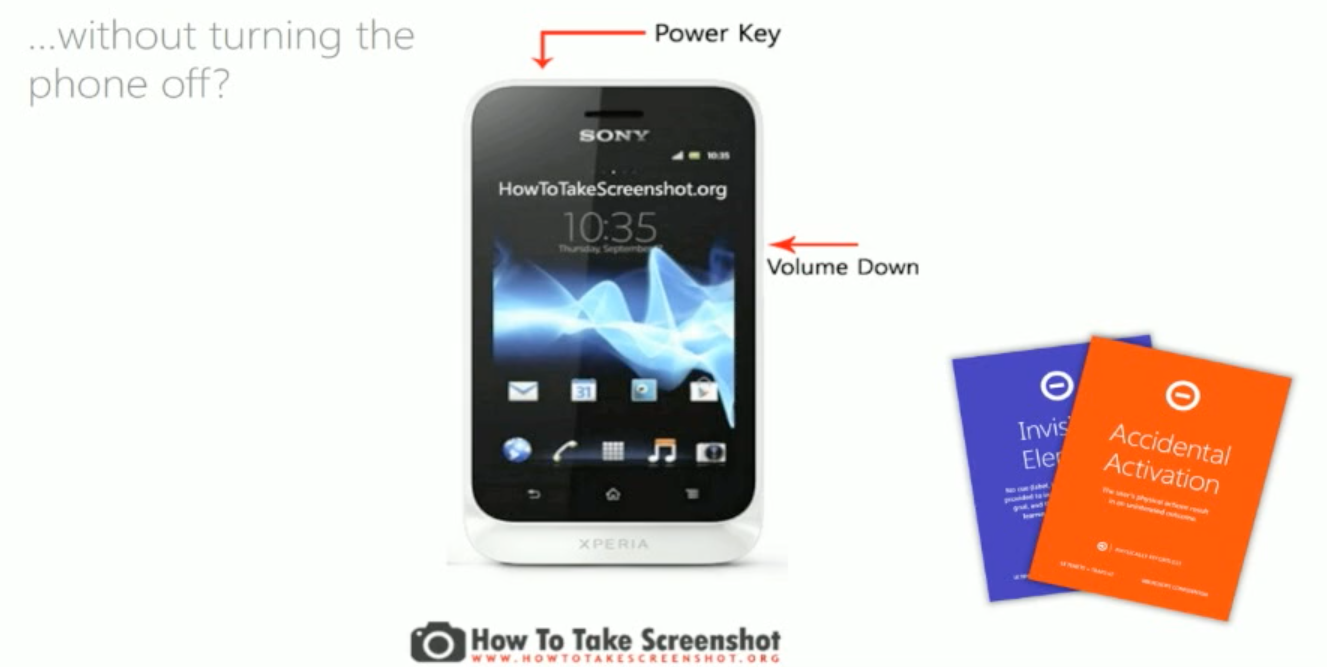
Physical challenge
Always use your design on the end product. When designing a mobile form, be sure you do it on a mobile phone.
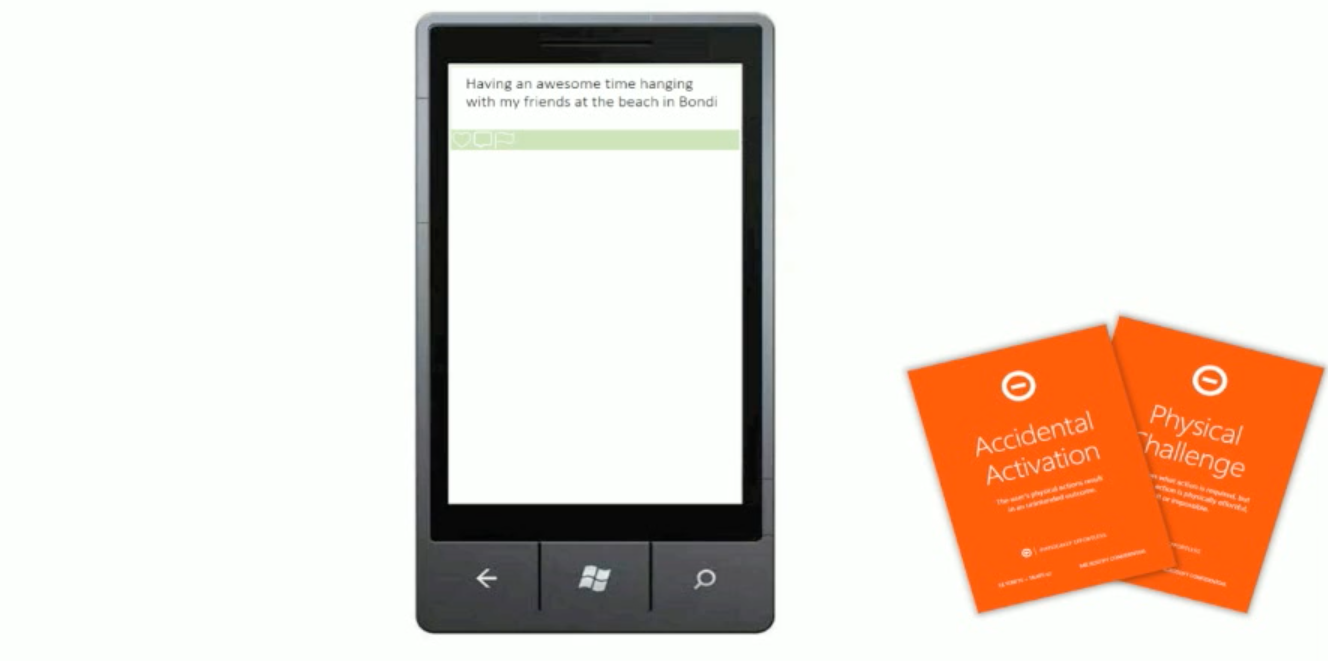
Invisible element on phone
Accidental activation if shutdown
Responsive Traps
- Be sure your response takes half a second at most
- If the response takes longer you should display a loading circle or show the progression of the process
Efficiency Traps
Information overload
Having a page that shows you too much information, be sure to keep it as simple as possible.
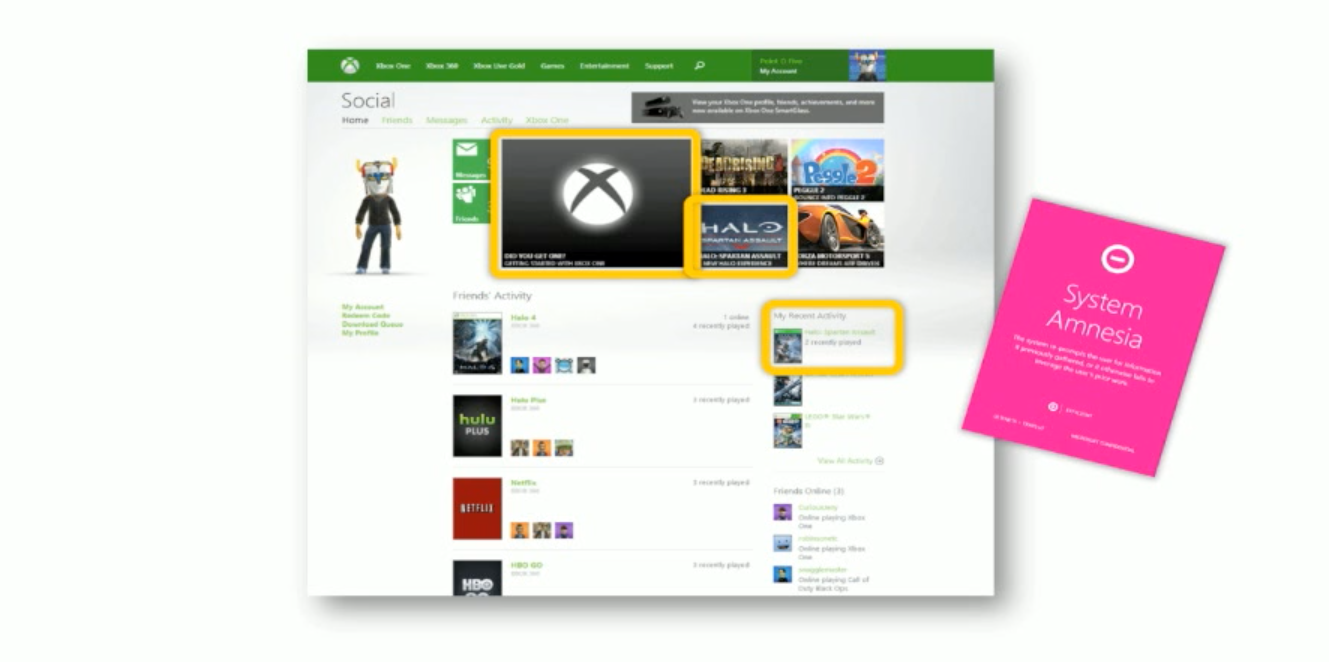
System amnesia
When they show you information that you don’t need
Autocorrect
The name says it all, when autocorrect changed your word in something unintended
Habituating Traps
- Doing things so many times it gets automatic and then it changes.
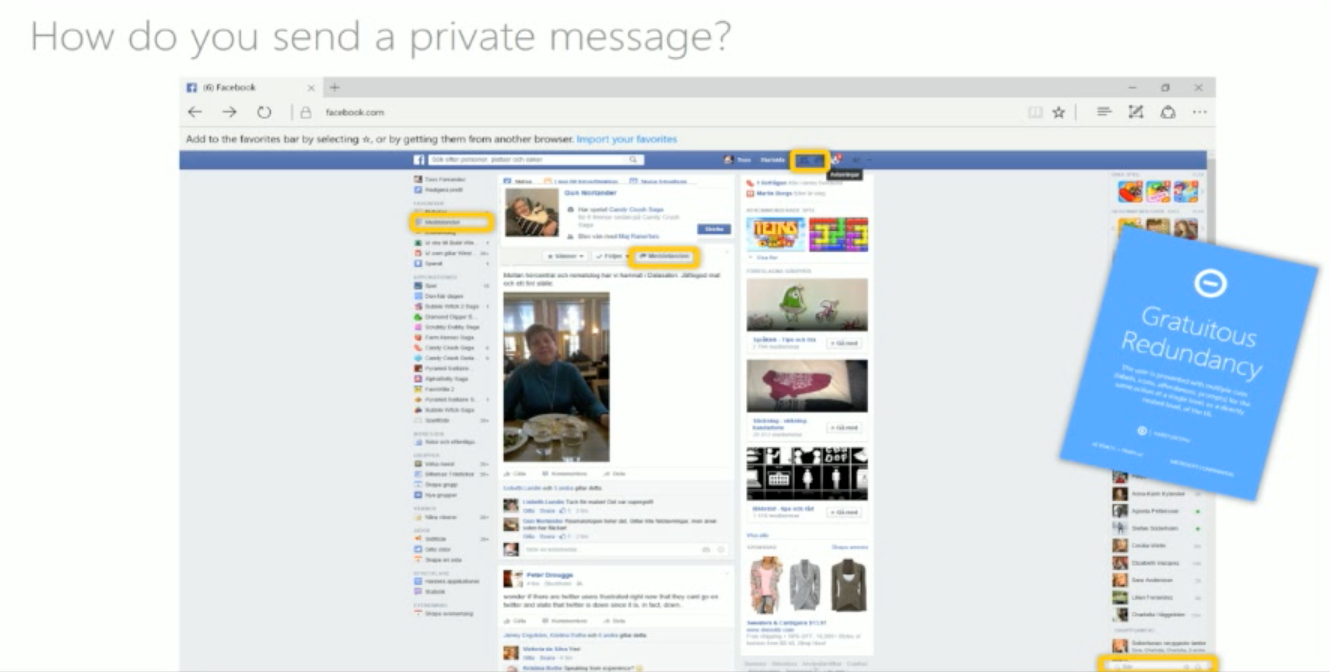
Non redundant gratuitous redundancy
Too much of the same action (ex. if you have one button that does multiple different actions on other systems)
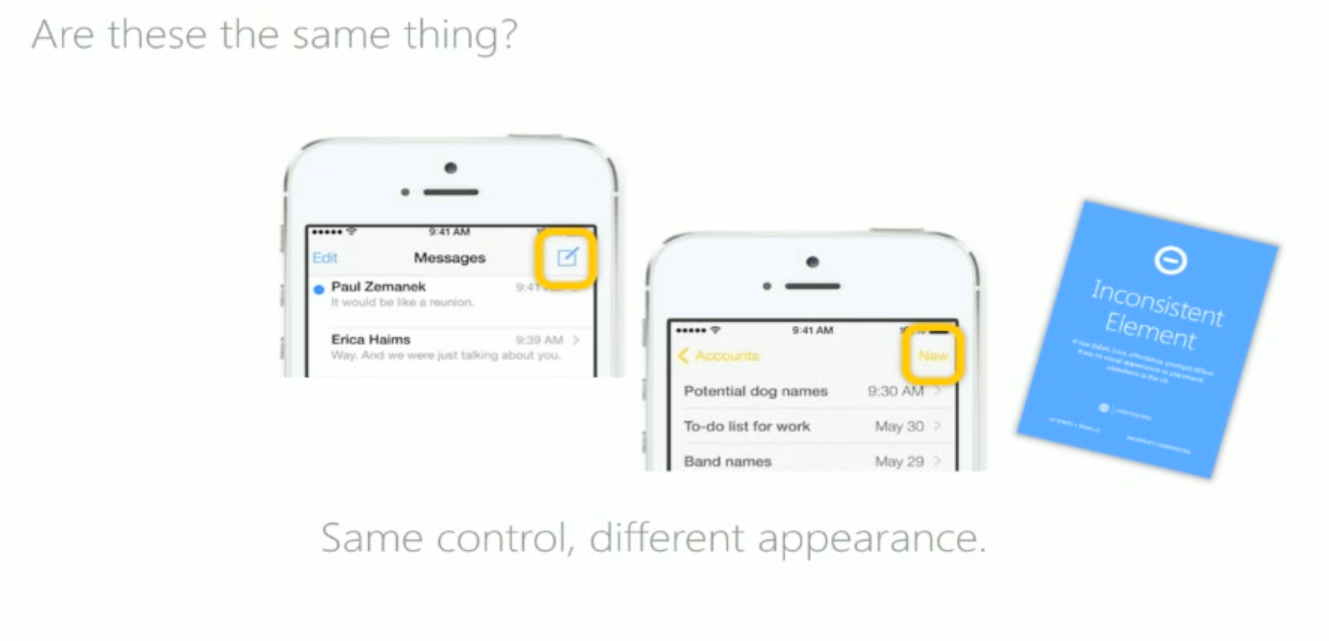
Inconsistency
Message button on an older version is on another place or it is replaced with text
Beautiful Traps
Unattractive design
Not appealing design where the user will not stay on the website.
Best Practices
- Identify common scenarios using the site
- Walk through all the different ways the user can complete a certain task
- Identify and log any traps you observe
- If you can’t find a trap, identify the tenet
- Document and discuss
Feed the links, tuples’ a bag – An introduction to Linked Data APIs - Sebastien Lambla

Sebastien Lambla is a keen open-source advocate and contributor, a long-time REST proponent and distributed systems aficionado With a career spanning over 20 years on many platforms, he’s a keen speaker and trainer, and has been known to talk a lot about technical things and unicorns.
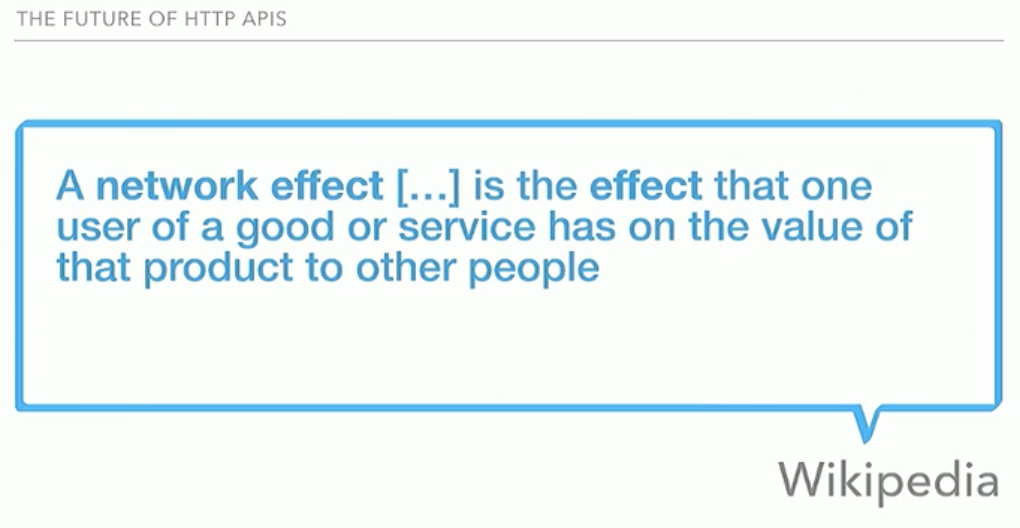
Started with a calm song of tuples’ a bag from Mary Poppins, Sebastien guides us through a possible future of HTTP API’s. When talking about creating our own protocol you know that it is recommended not to not to reinvent the wheel and use HTTP instead. Someone else did the hard work, so why should you? This is called the network effect.
How is HTTP designed?
- Model things - Resources (Person, Animal, Fruit)
- Interact with things - Operations (POST, GET, PATCH, DELETE)
- Understand the result of the interaction - Common Responses (200 - OK , 201 - Created, 400 - Bad Request)
- Reuse existing libraries
- One interface to be taught for everything
Common Media Types
- Expose the structure of data in a common format
- Reuse existing libraries (JSON)
Hypermedia Media Types
- Have structure and links understood and defined commonly
- Typed links - A link that knows where to go next
- Reuse existing libraries (HAL)
Common Language
JSON-LD will try to use a common language for everyone to understand. It is a lightweight Linked Data format, easy for humans to read and write. It is based on the already successful JSON format and provides a way to help JSON data interoperate at Web-scale. JSON-LD is an ideal data format for programming environments, REST Web services and unstructured databases such as CouchDB and MongoDB.
Example:
{
    "@context":
    {
        "author": {
            "@id": "http://schema.org/url",
            "@type": "@id"
         }
    },
    "author": "https://serialsev.com/author/"
}
In the above example, author is an uri which is the identifier of a resource. If you follow the uri, you will find a resource that is defined as a data type that everybody understands and everyone has agreed upon. Again, here we use the network effect because the last thing we want is to rebuild stuff.
If you are interested in playing with the format, there is a playground where you can try out examples: Playground
When we open the playground, you can see a couple of examples you can look at.
{
  "@context": "http://schema.org/",
  "@type": "Person",
  "name": "Jane Doe",
  "jobTitle": "Professor",
  "telephone": "(425) 123-4567",
  "url": "http://www.janedoe.com"
}
The context defines the uri where to go and the type that tells us which resource we are retrieving. Finally the exact uri link will be http://schema.org/Person. If you visit the uri, you’ll get this:
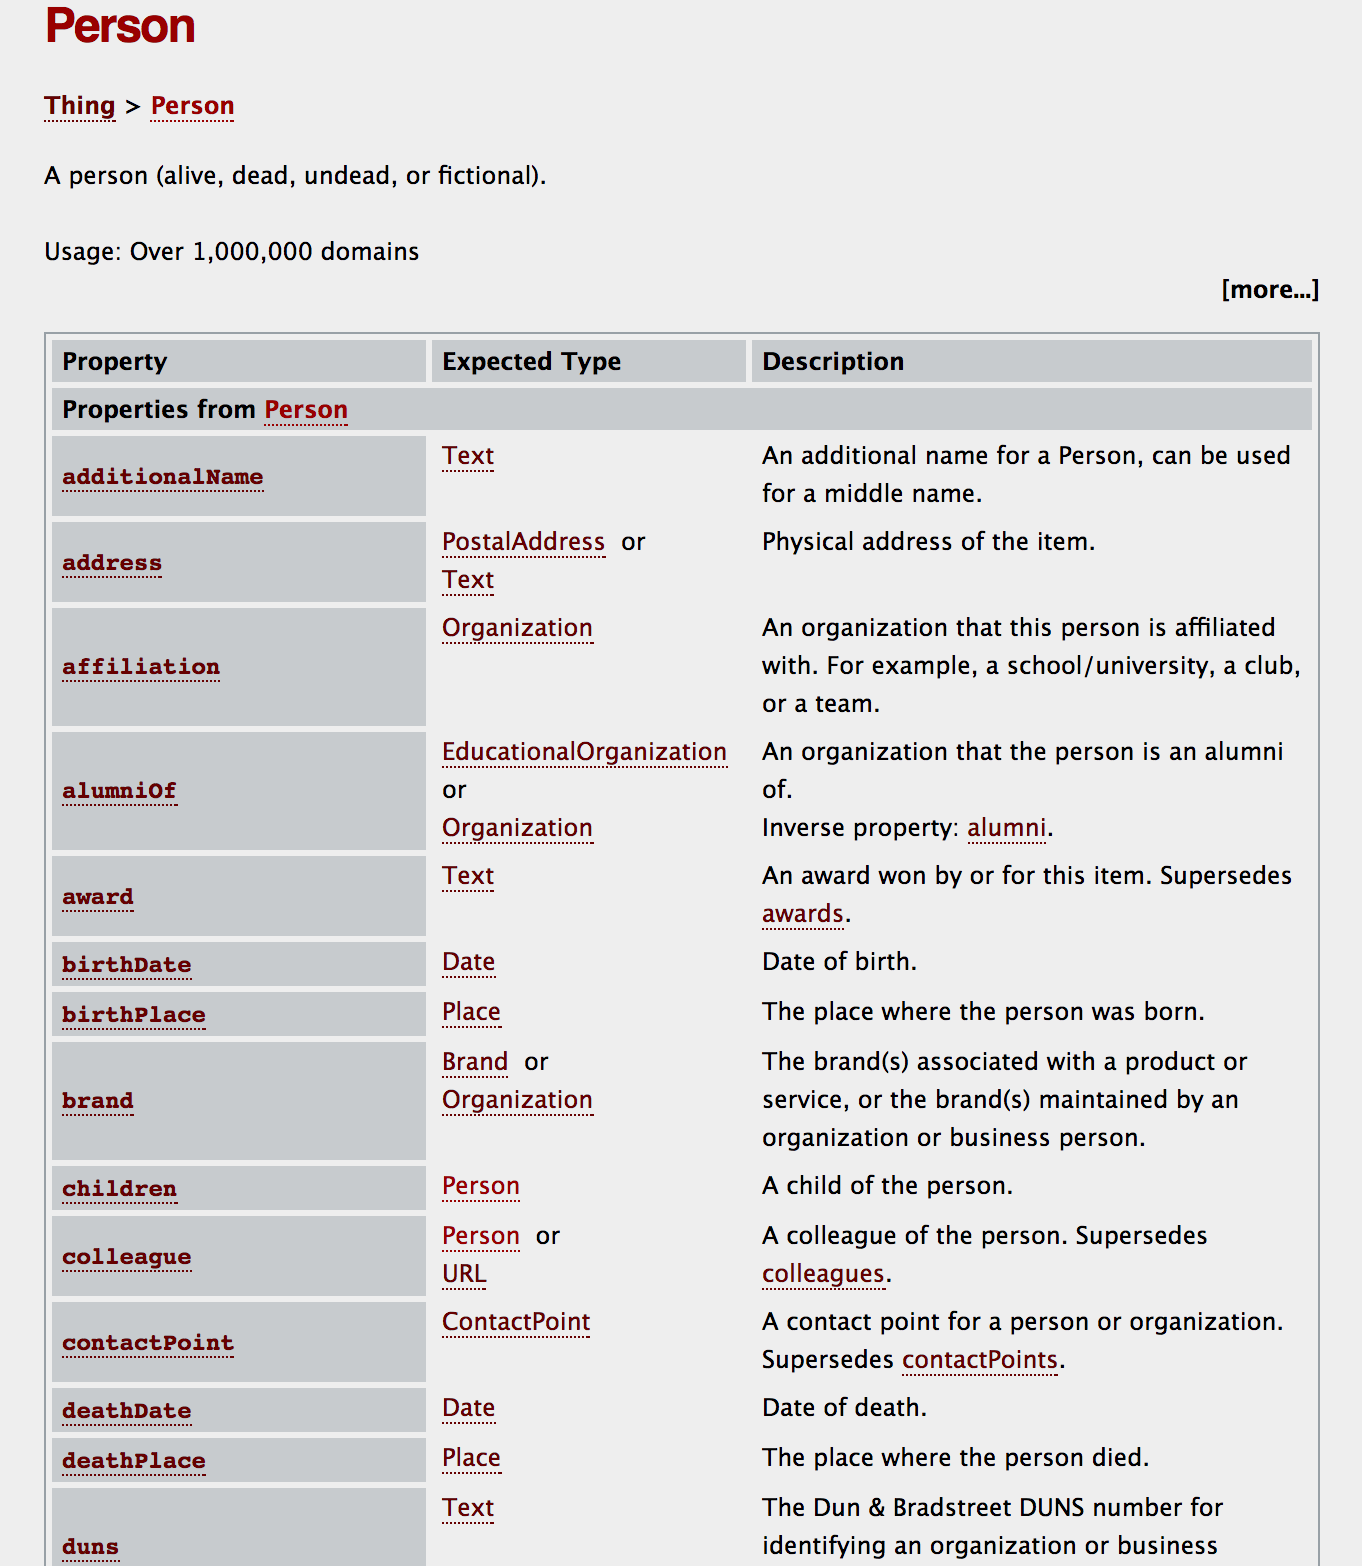
When finding the Person resource we see that there are a lot of properties already defined and documented by several people so you don’t have to.
When looking back at our example you can use the property already defined in the resource and use them to initialise.
If you reuse the property defined, you will get the proper documentation for it.
Some nice tools
Conclusion
Øredev is one of the best conferences I attended, not only did it innovate in different talks, it managed to organize so many topics to attend. Not only did it improve my technical skills, it also taught me management skills and a realistic view of what the world is today. Very well organized, interesting talks, great local dishes from Sweden and beautiful sightseeing in Malmö.


